
Tuesday, December 31, 2019
design and print a simple but useful clip!
OK, here are the dimensions for the clip design I did in Fusion 360 and made a video about how to go about making your own. this is the base clip in a 1//2 section so you'll need to mirror it.

Monday, March 4, 2019
Flappy Hawk Assembly
OK, this will be a basic flappy hawk assembly instructions. More for the 3D printed parts, stringing and weighting is kinda trial and error at this point.


First off, printing settings, these are just suggestions that have worked for me, experimentation is fun though! NO SUPPORT USED!!! If you have IdeaMaker or Simplify 3D you can place supports inside the body cavity if you want, but really not needed.
- Wings - it's all 4's with a 0.2 layer height, 4 Shells, 4 top, 4 bottom, 40% infill. this makes the wings weight up a bit which is needed for balance
- Body & Tail - 0.2 layer, 2 or 3 shells, 2 bottom, 3 top, 20% infill
- Hanger, hooks(need 2) and pull(need 2 or maybe 3) - pretty much what ever you want and works well for your printer, 2 or 3 shells with 3 bottom/top layer as 20% infill seems decent for me.
**TEST AND FIT ALL MOVING PARTS BEFORE GLUING ANYTHING!**
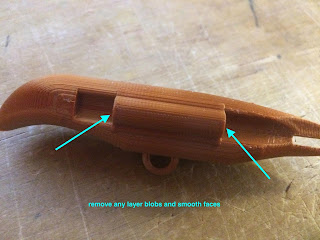
Once printed you'll likely need to do a little cleanup. The meeting faces between the wings and the body hinge needs to be smooth and clean of print boogers, strings and rough edges.

Clean up mating faces of hinge as best you can

After Cleaning up an faces, take a piece of standard PTFE tubing (4mm exterior by 1.75/2mm interior)
and cut a length just short of the hinge length in the body, and insert into the body hinge of each half.

Now Prep the holes in the wing, cut a scrap of filament (1.75) and use it to test and make sure it can slide in and through, but not so loose it'll just fall out. With the printing layers it should be a bit too hard to get in, I use another scrap piece of filament and mount in a drill, spinning at a very slow speed, use it to ream out the opening! Do both sides!

Now just place the wing in the body half, and slide the piece of filament from the rear through the wing and body to create the hinge. Slide it in till it just comes out the front, but not out so far it's beyond the indent in the body. You can snip off the excess at this point at the back, though I leave it a tad long still so I can grip it and remove if there is an issue down the road!


At this point go ahead and flop it around and make sure there isn't anything binding at the hinge on either wing!. If all is good, you can glue the body halves together. I take it all apart just because it's easier to handle that way. I apply glue on the front 2/3rds of the body, clamp it and use the tail slipped in to make sure it's all aligned. I only glue the front 2/3rds because we don't want to get glue on the tail. I WOULDN'T GLUE THE TAIL IN! as it's a lot easy to work on the wings and hinge later if you can pop that tail out!! The Tail is indented to align everything but should be tight enough to stay on its own.

If you took off the wings to glue the body together, pull the taill of, re install the wings and then slide the tail back in.
OK, that's it, you now have the main body built. Next is stringing it.
Subscribe to:
Posts (Atom)